St. Patrick’s Day Clover Mini Quilt Pattern Tutorial


St. Patrick’s Day is just around the corner. We have created a scrap-busting mini quilt pattern to add a little Luck of the Irish to your home. Gather your saved low-volume and green fabrics to create this fun mini clover quilt. If you need a few extra scraps, we have lovely REMNANT BUNDLES to add to your stash. They are sorted by color and contain an assortment of high-quality quilting cotton fabrics from top designers.
Clover Mini Quilt Pattern Download: CLOVER MINI QUILT PATTERN
Lucky Clover Mini Quilt Tutorial
Clover Mini Quilt Details:
The finished mini quilt size is 14 inches x 14 inches. This in an advance beginner project. We have rated it a little more difficult because of the size of each block. They are very small and it is important that you are comfortable with sewing a smaller scale. Also, you will need to know how to baste, quilt and bind the finished quilt top.
This pattern requires a seam allowance of ¼” throughout the entire project. All dimensions are in written height x width throughout instructions.
Materials Needed for Clover Mini Quilt:
Green Fabric: Assorted Quilter’s Weight Green Fabric at least 1.5” x 1.5” in size.
Low Volume Fabric: Assorted Quilter’s Weight Low Volume Fabric at least 1.5” x 1.5” in size. (Note: Low Volume Fabric are basically soft cream, white, neutral, or pale colored printed fabrics. They typically have a subtle pattern and design which will offset the bright green fabrics.)
Backing Fabric: ½ yard coordinating fabric – we used a low volume fabric
Binding Fabric: ½ yard coordinating fabric – we used a cheerful green print
Quilt Batting: sized 18” x 18”
Sewing Supplies Required for Clover Mini Quilt:
Half Square Triangle (HST) Ruler – such as CREATIVE GRIDS | HALF SQUARE 4-IN-1 TRIANGLE QUILT RULER, Straight Ruler, Scissors, ROTARY CUTTER, STRAIGHT PINS, Sewing Scissors, BINDING CLIPS and Safety Pins.
Cutting Information:
Use the cutting chart below to determine size of each fabric square, corresponding color and the total number of squares required for each fabric color.

Note: The abbreviation “HST” = Half Square Triangle
Create Green on Green Half Square Triangles:
This step requires four 3” x 3” green squares. Draw a diagonal line across two of the green squares on the WRONG side of the fabric.

Place each diagonal marked green square on top of the unmarked green square - WRONG sides facing out and RIGHT sides facing each other.
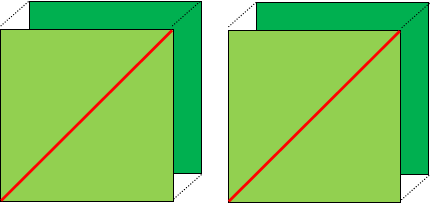
Using the marked diagonal line as a guide, sew a 1/4” seam allowance to sewing along both sides of center marked line.

Cut sewn square along marked diagonal line. Then trim down each of the four triangles down to 1.5” x 1.5” square using a HST Ruler. Press open seam.

Create Green & Low Volume Half Square Triangles:
This step requires eight 3” x 3” green squares and eight - 3” x 3” low volume squares. Draw a diagonal line across the 8 of the green squares on the WRONG side of the fabric.

Place each diagonal marked green square on top of the unmarked low volume square - WRONG sides facing out and RIGHT sides facing each other.

Using the marked diagonal line as a guide, sew a 1/4” seam allowance to sewing along both sides of center marked line.

Cut sewn square along marked diagonal line. Then trim down each of the four triangles down to 1.5” x 1.5” square using a HST Ruler. Press open seam.

Block Layout:
Now that all the parts are cut and sewn, we can begin to bring it all together. Below is a block chart showing how many fabric pieces are required for each shape and color. Now is a good time to double check your blocks and make sure you have everything you need.

Step 1: Layout Blocks
Layout all the blocks on your table or cutting mat by following the Block Layout Guide diagram below.

Step 2: Begin Sewing Rows
Begin sewing the top row of 14 blocks together using a 1/4” seam allowance. Press seams to the right. Sew the 2nd row of 14 blocks. Press seams to the left. Continue sewing remaining 12 rows. Alternate pressing right and left for each row.

The extra step of changing the direction of seam pressing between rows will allow you to nest the seams together in the next step to create more accurate corner joining. See diagram below.
Step 3: Final Sewing to Complete Clover Mini Quilt Top
Sew all 14 rows together. Press open seams along each row. See diagram below for complete mini quilt.

Step 4: Finishing your Mini Quilt
Finish this mini quilt any way you would like. I have included in this pattern, the materials needed to create a mini quilt, but this cute patchwork clover would make an adorable pillow or even a large fabric trivet by using insulation fleece such as Pellon 975 Insul Fleece.
Congratulations! You are finished!
We would love to see how your mini quilt turned out! Tag us on Instagram @little.fabric.shop with the hashtag #stpatrickcloverquilt so we can see your project and you can inspire other makers with your work.
We have many tutorials to help grow your sewing pattern library and hopefully, also improve sewing techniques. Check out all of blogs for more inspiration, ideas, and tips on our BLOG. If you would like us to create a specific tutorial or pattern, please let us know. We are here to help! Contact us at: hello@littlefabricshop.com


