Pumpkin Mug Rug Sewing Tutorial


We are in the full swing of autumn. That means hot apple cider, hot chocolate, tea, and all those warm drinks that keep us comfy and cozy this time of year. This month’s Little Fabric Shop tutorial is a Pumpkin Mug Rug. We’re bringing you two versions of this fun and beginner friendly sewing project – a solid pumpkin and patchwork pumpkin mug rug. Let’s gather our fall themed fabric in rich autumn color tones of orange, green, brown and red, and get sewing!
Solid Pumpkin Mug Rug Tutorial

General Solid Pumpkin Mug Rug Project Information:
Finished Size: H: 7” x W: 7”
Difficulty: Beginner
Seam Allowance: 1/4” throughout pattern unless otherwise noted.
Dimensions: are written height x width throughout instructions.
Backstitch: at the beginning and end of all seams to lock stitches in place.
Solid Pumpkin Mug Rug Project Tutorial Materials Needed:
¼ Yard Quilters Cotton for Orange Pumpkin Fabric
One Fat Quarter (H: 22” x W: 18”) Quilters Cotton Fabric for Background Fabric – front & back
Scrap Piece of Fabric for Stem
¼ yard of Fusible Fleece (such as Pellon 987F)
Pumpkin Mug Rug Supplies Needed:
Ruler, Scissors, Rotary Cutter, Mat, Pins, Marking Tool, Chopstick or Pointed Tool
Solid Pumpkin Fabric Cutting:
Cut out all fabric pieces as shown in the Solid Pumpkin Fabric Cutting Information diagram below. Use the Solid Pumpkin Fabric Block Placement diagram as a reference.


Create Pumpkin Body:
Take four of the #2 Blocks and draw a diagonal line across the center of each block with your marking tool. Place one block in each corner of the orange pumpkin body – Block #1 – as shown in the diagram below. Sew along the line.

Trim the fabric to a ¼ inch seam allowance and then press the fabric open.

Create the Stem:
Take the remaining #2 Block and draw a diagonal line across the center of the block with your marking tool. Place the block at the top of the green stem – Block #3 – as shown in the diagram below. Sew along the line.
Trim the fabric to a ¼ inch seam allowance and then press the fabric open.

Finish the Solid Pumpkin Top of the Mug Rug:
Attach Block # 4 to the finished stem along the top as shown in the diagram below. Press seams open.

Attach Blocks #5 to either side of the finished stem as shown in the diagram below. Press seams open.

Attach one of Block #6 to the top of the finished stem piece and one Block #6 to the bottom of the finished pumpkin body as shown in the diagram below. Press seams open.

Attach this finished stem block to the finished pumpkin body block as shown in the diagram below. Press seams open.
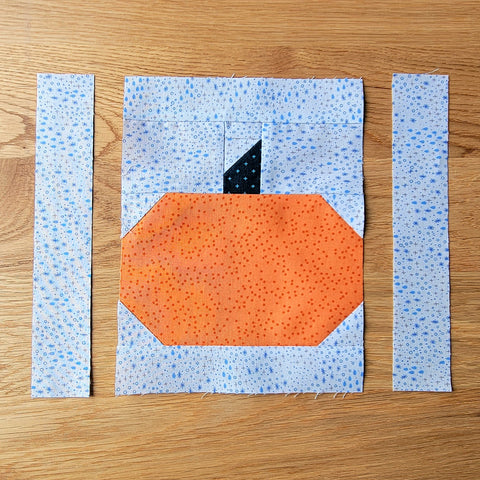
Attach Blocks #7 to the left and right side of the finished pumpkin as shown in the diagram below. Press seam open.

Trim all side borders down so that the measure block measures 7.5" x 7.5" You will trim the top borders down to 3/4" and the left and right borders to 3/4".

Finishing the Mug Rug Project:
Now that the top of the Mug Rug is finished, you can link to our Mug Rug tutorial for the final steps in finishing this project.
Link to Mug Rug Tutorial: Mug Rug Finishing Instructions
Patchwork Pumpkin Mug Rug Tutorial

General Patchwork Pumpkin Mug Rug Project Information:
Finished Size: H: 7” x W: 7”
Difficulty: Beginner
Seam Allowance: 1/4” throughout pattern unless otherwise noted.
Dimensions: are written height x width throughout instructions.
Backstitch: at the beginning and end of all seams to lock stitches in place.
Patchwork Pumpkin Mug Rug Project Tutorial Materials Needed:
Assorted Scraps of Orange Fabric at least 2” x 2” in size for Patchwork Body of Pumpkin
One Fat Quarter (H: 22” x W: 18”) Quilters Cotton Fabric for Background Fabric – front & back
Scrap Piece of Fabric for Stem
¼ yard of Fusible Fleece (such as Pellon 987F)
Pumpkin Mug Rug Supplies Needed:
Ruler, Scissors, Rotary Cutter, Mat, Pins, Marking Tool, Chopstick or Pointed Tool
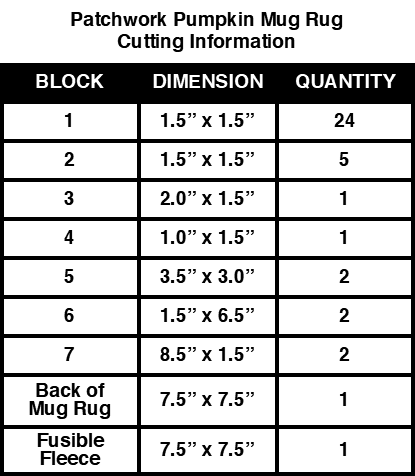
Patchwork Pumpkin Fabric Cutting:
Cut out all fabric pieces as shown in the Patchwork Pumpkin Fabric Cutting Information diagram below. Use the Patchwork Pumpkin Fabric Block Placement diagram as a reference.

Create the Patchwork Pumpkin Body:
Take four of the #2 Blocks and draw a diagonal line across the center of each block with your marking tool. Create four Half Square Triangles by placing Block #2 over a Block #1 as shown in the diagram below. Sew Along the line. If you would like more information on how to create Half Square Triangles, check out our Easy Quilt Blocks using Half Square Triangle Tutorial.

Trim the fabric to a ¼ inch seam allowance and then press the fabric open.
Layout the sewn half square triangles and remaining orange blocks – Blocks #1 – as shown in diagrams below.

Sew together one row at a time. Press open the seams as you go.


Create the Stem:
Take the remaining #2 Block and draw a diagonal line across the center of the block with your marking tool. Place the block at the top of the green stem – Block #3 – as shown in the diagram below. Sew along the line.
Trim the fabric to a ¼ inch seam allowance and then press the fabric open.

Finish the Patchwork Pumpkin Top of the Mug Rug:
Attach Block #4 to the finished stem along the top as shown in the diagram below. Press seams open.

Attach Blocks #5 to either side of the finished stem as shown in the diagram below. Press seams open.

Attach this finished block to the finished pumpkin body block as shown in the diagram below. Press seams open.

Attach Blocks #6 to the top and bottom of the finished pumpkin as shown in the diagram below. Press seams open.

Attach Blocks #7 to the left and right side of the finished pumpkin as shown in the diagram below. Press seam open.

Trim all side borders down so that the measure block measures 7.5" x 7.5" You will trim the top borders down to 3/4" and the left and right borders to 3/4".

Finishing the Mug Rug Project:
Now that the top of the Mug Rug is finished, you can link to our Mug Rug tutorial for the final steps in finishing this project.
Link to Mug Rug Tutorial: Mug Rug Finishing Instructions
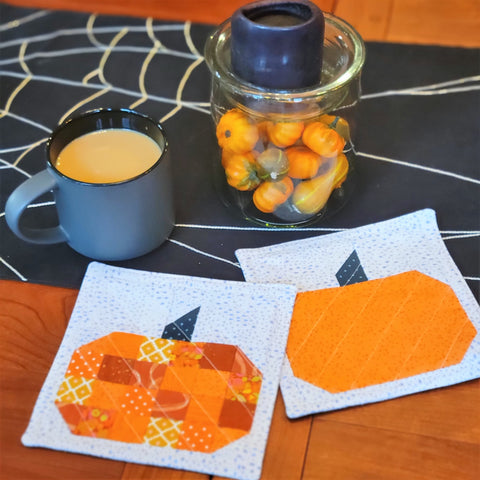
That’s it! You’re finished. These Mug Rugs are a quick and easy sewing project. They add a little seasonal fun to your home or office, and they make great gifts. If you make one, tag us @littlefabricshop on Instagram. We love to see your work and share it with our sewing community. Happy Sewing!


