Rolling Flag Table Runner Tutorial


As summer is just around the corner, we are getting excited for Barbeque Season! There is nothing better than heading outdoors and cooking on the grill for family and friends! To get us ready for outdoor dining, Little Fabric Shop created a simple and fun Rolling Flag Table Runner Tutorial. This project uses the same block throughout and is just rotated to create the table runner. Who doesn’t love simple and quick? The table runner was designed for Red, White and Blue décor, but any colors can be used.
American Flag Table Runner Pattern
PDF Link to Pattern: Rolling Flag Table Runner Tutorial
Project Details:
The finished size of this table runner is W: 9” x L: 45”. This tutorial is beginner friendly. It assumes basic knowledge of quilting, basting, and binding. The Seam Allowance is 1/4” throughout the pattern. All dimensions are written in height x width format throughout the instructions. We recommend reading through all the tutorial instructions prior to sewing and beginning this project.
You will need the following supplies to complete this table runner: Iron, Rotary Cutter (check-out our new Midnight Edition Rotary Cutter from LDH Scissors), Mat, Ruler and Pins (the Clover Flowerhead pins are a shop favorite).
The Wrong Side of Fabric is abbreviated to: WSF and the Right Side of Fabric is abbreviated to: RSF
Below is a visual diagram of how Fabric Sides are shown throughout the pattern:

Materials Needed for Rolling Flag Tutorial:
Use the chart below to determine how much fabric is needed for each block. We used assorted fabrics from the Cotton+Steel Basics fabric line to make this table runner.

Cutting Instructions:
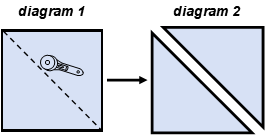
Blocks A & D: Cut 3 Squares of each color to 6.5” by 6.5” (diagram 1). Then cut each of the squares in half along the diagonal (diagram 2). You will have 12 triangles (six of each color). For this pattern you will only need 5 of each color triangle so go ahead and discard the extra.
Blocks B & C: Cut 5 Rectangles of each color to 14” x 3.5” (diagram 3). Then cut each point to a 45° angle to create a trapezoid shape (diagram 4). Use the mat’s 45° angle on your ruler or cutting mat.

Block Layout Guide:
Below, you will find a layout diagram as to how all the cut fabric pieces fit together.

Seam Pressing Guide:
Three of the finished blocks will have all the seams pressed to the RIGHT and two finished blocks will have all the seams pressed to the LEFT. This will allow the blocks to nest neatly together when finishing the table runner. Below is a visual guide to pressing.

Step 1: Sew Blocks B & C Together
Lay Block A over Block C with RSF and aligning all of the corners with each other.

Sew along the longest edge with a 1/4” seam allowance.

Repeat for all remaining blocks. Alternate press 3 blocks seams to the right and press three blocks’ seams to the left as shown in Seam Pressing Guide above.
Step 2: Attach Block A & D
Lay Block D on top of Block C with RSF. Align the longest edge of Block D with the bottom edge of Block C. Eyeball center Block D’s triangle point over Block C. Sew along the longest edge of Block D and bottom edge of Block C.

Press seam in the same direction as you did for Block B & C. Three blocks will be pressed to the RIGHT and two blocks will be pressed to the LEFT.
You will notice that Block D is larger than the sewn Block B & C. You will square up the blocks in the next step.

Repeat this step for all remaining D Blocks. To attach Block A, follow the same steps you did to attach D, only Block A will be Sewn to Block B.

Once again, press the seam in the same direction as you did for the other seams. Three blocks will be pressed to the RIGHT and two blocks will be pressed to the LEFT. Block A, like Block D, is larger than the sewn Block B & C. You will square up the blocks in the next step.

Step 3: Square Up Blocks
Using your ruler and rotary cutter, trim off all the extra edges on all four sides to create a square measuring 9.5” x 9.5”.

Step 4: Attach Blocks Together
Line-up your blocks so the pressed seam directions are alternating. Right, Left, Right, Left, Right.

Nest corners of blocks together and pin to hold in place. Sew blocks together. Press sewn seams open.

Baste, Quilt and Bind your finished table runner top in your preferred method. We quilted this table runner with a simple straight stitch, following the seams of the blocks.
Congratulations! You are finished!
We created this tutorial to be shared. Sewing is a passion for us, and we love to create projects for our sewing community. Please pass this tutorial on to your sewing friends. If there are any projects you need help with or would like to see a tutorial for, please let us know. It is a joy to work with our fellow sewists and create handmade fabric pieces.
If you make this table runner, please tag us on Instagram @little.fabric.shop so we can see your work and we can share your creativity to inspire other makers. Happy Sewing!


