How to Sew a Fabric Basket with Handles


Sewing a fabric basket is fun and easy! There are so many storage uses for these adorable bins – fabric, clothing, and toys – to name a few. What is even better? We used scrap fabric that we had on hand to create these bins. We love repurposing fabric from other sewing projects!
Scrappy Basket Exterior Tutorial and Directions
We adapted the Friends of the Hour Basket Pattern by, Kelbysews to create the bins.
Continue reading for our step-by-step tutorial on how to make the patchwork exterior panels. We have also included a PDF downloadable set of instructions for you to keep at your fingertips! Check-out the link below:
PDF Download: Scrappy Basket Exterior Tutorial from Little Fabric Shop

Step 1: Purchase Friends of the Hour Basket Pattern
To complete this project, you will need to purchase the Friends of the Hour Basket Pattern by, Kelbysews on Etsy. At the time of writing this sewing tutorial, the pattern is sold for $5.00.
Our basket tutorial has been adapted from this pattern and will ONLY give you instructions on how to create the exterior patchwork blocks and the adjusted dimensions for the interior fabric and fusible fleece. All instructions for the dimensions of the handles & how to assemble the basket are in the original Kelby Sews pattern.
Step 2: Fabric Basket Project Details
The finished size of this basket is H: 9” x W: 12” x D: 6”. This is a great pattern for beginner bag makers. No zippers required! Throughout the entire project, you will use a ¼” seam allowance. Measurement dimensions are written height x width throughout the instructions.
As always, read through all the directions prior to beginning. This is an important step! While we cannot guarantee that you will not need your seam ripper, you will mostly likely avoid extra time with this tool!
Step 3: Gather Sewing Materials and Fabric
In total, you will need assorted quilters cotton weight fabric to create 44 squares with a height and width of 3.5 inches per square. We love using scrap fabric for this project. If you would like to add colors or patterns, check-out our Cotton+Steel Basics fabric in the shop.
You will also need ½ yard of quilter weight cotton fabric for the interior basket lining. Our Century Solids fabric works great! A ½ yard of fusible fleece such as Pellon 987F is required as well.. And of course, the Friends of the Hour Basket pattern.
Step 4: Supplies Needed
To complete this project, you will need a rotary cutter – with a sharp rotary cutter blade, a cutting mat, ruler, and pins. A hot iron and pressing board will also be required. We will be using a sewing machine to complete this project.

Step 5: Cutting
Begin by cutting out all the parts.
- Exterior Fabric: Cut 44 pieces 3.5” x 3.5” squares
- Interior Fabric: Cut 2 pieces 12.5” x 18.5”
- Fusible Fleece: Cut 2 pieces 12.5” x 18.5”
Step 6: Layout Fabric
Layout the cut Exterior Fabric cut pieces for the two separate sides of the basket. We have an example of one side below to show you where to place each fabric.

Step 7: Begin Sewing the Sides of the Basket
For the first side, begin by sewing the top row of 6 Exterior Fabric blocks (sized: 3.5” x 3.5”) together using a 1/4” seam allowance. Press seams to the right.
Continue sewing the remaining three rows as you did for row 1. Alternate pressing right and left for each row. See diagram below:

Repeat this process for Side 2 of the basket.
The extra step of changing the direction of the seam pressing between rows will allow you to nest the seams together in the next step to create more accurate corner joining.
Step 8: Sew all the Rows Together
Begin to join the horizontal rows together. Lay Row 1 on top of Horizontal Row 2 with the Right Sides of Fabric facing each other.
Line-up all 4 corners.
Next, by lining up each blocks seam with each other, the pressed seams from either side of the rows will nest neatly into the fabric. The top fabric seams will be pressed in the opposite direction of bottom fabric. This allows the corners to lock -or- nest nicely in place. Pin to keep the corners in place.
Below is a visual of a nested corner from the side.
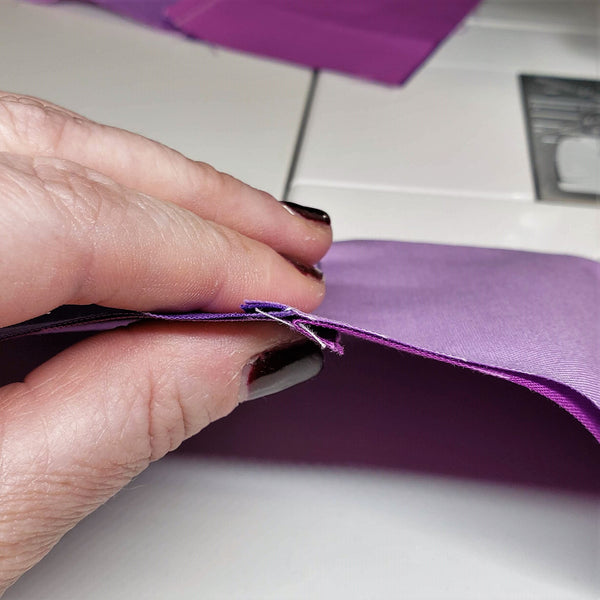
Pin to hold each seam corners together. You will have lined up a total of 5 corners in all.
Sew all four rows of Block 1 together. Press seams towards the bottom of block. See diagram below:

Repeat this process for the other exterior side.
Step 9: Use the Kelby Sews Pattern to Complete the Project

Whew! The hard part is finished! That wasn’t so bad? All of your exterior fabric, interior fabric and fusible fleece preparation is complete. Now you will need to refer to the Friends of the Hour Basket pattern for instructions on cutting the handles and assembling all the parts.

Organizing Solutions for the Home
This fabric basket is such a cheerful way to organize and store crafting, sewing, and other home projects in a neat and tidy way. This sewing tutorial has been created for your personal use. We would love to see how your project turned out! Tag us on Instagram @little.fabric.shop so we admire your hard work and you can inspire other makers.


