Simple Table Runner Using Flying Geese Quilt Blocks

Knowing how to make Flying Geese is an important skill to have in your quilting toolbox. There are many different sewing methods to make these blocks. We are going to show you how to use the Creative Grids Ultimate Flying Geese Tool to make these blocks quickly and accurately. AND THEN we’re going to put them all together to make an adorable Halloween Table Runner. This is a beginner friendly project that will add a little fun and whimsy to your table this fall.
How to Make Flying Geese Quilt Blocks
The Creative Grids rulers are just amazing. We love how clearly the ruler guides are marked. Additionally, the rulers have non-slip material on the back to keep it in place when using your rotary cutter. We’re going to show you how to make the Flying Geese “Heart” method.

The upper left side of the ruler has a measuring chart to indicate what size and how many squares are needed to make four complete flying geese. Select the finished size of your flying geese and then follow the cutting guide to the right of it. For this project, our finished flying geese size will be H: 3” x W: 6” – or – Dimension “F” on the ruler. Begin by cutting one square to 7 ¾” x 7 ¾” and then cut four squares to 4 ¼” x 4 ¼”.

Draw a diagonal line on the wrong side of the fabric across the four smaller 4 ¼” x 4 ¼” squares.


Take two of the smaller squares and place them right sides facing each other at each corner of the larger square. The smaller squares will overlap each other in the center of the larger square. Pin to hold squares in place.

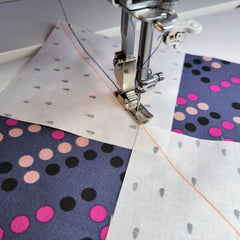
Sew with a ¼” seam using the drawn line as a guide on either side of this guide line.


Once the fabric is sewn, cut along the center drawn line.


Fold out the two smaller squares on each cut block and press open. It will have a shape of a heart.

Place the remaining two small squares on each of the “heart” units. Sew with ¼” seam allowance using the drawn line as a guide on each side of the line.


Once sewn, cut along the center drawn line.


Fold out the smaller square on each of the four blocks and press open.


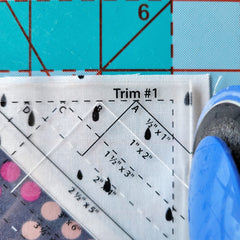
Now you will need the Creative Grids Ultimate Flying Geese Tool to square up and trim your blocks to the perfect size. We used Dimension “F” to make a 3” x 6” finished flying geese. You will use the “F” guide for all cutting.

Line up the edge of the inner triangle with the “F” guide-line. Trim the excess fabric on the right and upper edge of the ruler.


Turn the ruler and the block by 90° and place the edge of the inner triangle along the “F” guide-line. Once again, trim the excess fabric on the right and upper edge of the ruler.


Repeat for all the blocks. You will have four perfect flying geese. Now let’s make a flying geese table runner.

Flying Geese Table Runner Tutorial
For this project, we used the Ghost Town fabric collection by MADE Everyday and FIGO Fabrics. The Ghost Town fabric collection is a modern twist on Halloween fun. There are cats in hats, and flying bats, candy dots, and marigold webs - all designed in a modern palette of orange, pink, black, and blue.
Keep reading for all the steps to complete this table runner. We have included a PDF download for this sewing tutorial. Click the link below to print and/or save this free sewing pattern.
PDF Download: Flying Geese Table Runner
Fabric Material Requirements:

Cutting Information:

Supplies Needed:
You will need a straight ruler, scissors, a rotary cutter, cutting mat, pins, ¼” presser foot, and the Creative Grids Ultimate Flying Geese Ruler.
Fabric Sides:

Create the Flying Geese Blocks:
You will be creating 4 flying geese in each triangle color for a total of 52 flying geese blocks. Use the flying geese tutorial above along with the Creative Grids Ultimate Flying Geese Tool to complete this step.
Assemble Table Runner Top:
Now for the fun part! You will layout the flying geese in two rows with 26 flying geese blocks per row. Randomly place your flying geese with the triangle points facing up in one row and down in the next. Refer to the diagram below.

Sew the 26 blocks in each column together first. Press fabric away from triangle point towards the long edge of the triangle.
Sew both columns together. Nest the seams in each row. Press open the long center seam.
Finishing Table Runner:
Now that the table runner top is completed, you can baste, quilt and attach the binding as you would for a quilt.

Congratulations! You’re Finished!
You have completed the Flying Geese Table Runner!
We created this tutorial to be shared. Sewing is a passion for us, and we love to create projects for our sewing community. Please pass this tutorial on to your sewing friends. If there are any projects you need help with or would like to see a tutorial for, let us know. It is a joy to work with our fellow sewists and create handmade fabric pieces.
If you make this Flying Geese Table Runner, please tag us on Instagram @little.fabric.shop so we can see your work and we can share your creativity to inspire other makers. Happy Sewing!


