Beach Headband Tutorial

Table of Contents
Summer has arrived and we are ready for the beach! Whether you are holding your hair in place from the breeze, trying cover-up the top of your head from the sun or in need of a quick, cute hair accessory for wet hair, the Beach Headband Tutorial is perfect for enjoying the lazy days of summer!
The pattern is Fat Quarter friendly. The only materials needed are fabric and elastic. That’s it! We have included sizing for Small, Medium, and Large. AND it is beginner friendly! No fancy skills required. Keep reading for a step-by-step guide to create a quick and easy summer accessory.
Summer Headband Hair Accessory Tutorial
PDF Pattern Download: Beach Headband Tutorial
Begin by Gathering Supplies & Materials.
SIZE OPTIONS: This tutorial allows for three different sizing options - Small, Medium & Large
DIFFICULTY: Beginner Friendly! No fancy skills required
MATERIALS: 1 Fat Quarter (18” x 22”) in cotton, poplin or light to medium woven fabric and 1/4 yard of 1” elastic
SUPPLIES: Iron, Rotary Cutter, Mat, Ruler, Straight Pins, Safety Pin, Sewing Machine,
PRIOR TO SEWING: Read all of the directions prior to beginning project.
DIMENSIONS: All dimensions are written in Length x Width.
ABBREVIATIONS: Right Side of Fabric: RSF | Wrong Side of Fabric: WSF
STEP 1: Cut Fabric
Main Fabric is the same size for each size option. Cut one Main Fabric to dimensions below.
Main Fabric: 18” x 12”
Select headband size and cut one each of Strap Fabric and Strap Elastic to dimensions below.
Strap Fabric:
Small: 6.0” x 3.0”Medium: 6.5” x 3.0”
Large: 7.0” x 3.0”
Strap Elastic:
Small: 4.5”Medium: 5.0”
Large: 5.5”
STEP 2: Begin Constructing Headband
Fold Main Fabric in half along long edge with RSF facing each other. With straight pins, mark at 7” and 11”. This will be the space used to turn the headband from the wrong side to the finished side in a later step. Do not sew in this space.

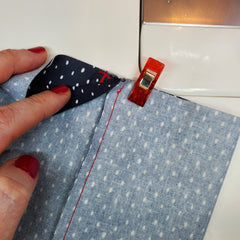
Using a 1/4” seam allowance, sew along the pinned long edge. Backstitch at the beginning and end of each seam to lock in place. DO NOT SEW in marked space.

Please Note: For our pictures, we used a contrasting thread so that the seams are more visible in photographs. Match your thread color to your fabric color to hide stitches when creating your headband.
STEP 3: Create Band
Fold Strap Fabric in half along long edge with RSF facing each other. Using a 1/4” seam allowance, sew along open edge. Backstitch at beginning and end of seam.

Turn strap fabric right-side-out. Iron so that the seam is along one of the long edges.
Place safety pin along one of the short edges. Pull elastic through one of the strap fabric openings.


When the elastic reaches the interior edge of the fabric, sew with a 1/8” seam allowance to tack the elastic to the strap. Backstitch at beginning and end of the seam.

Continue pulling elastic through to the other open edge. Tack stitch at edge of fabric using a 1/8” seam allowance. Backstitch at beginning and end of seam.

Place needle down at one of the tacked short edges, 1/4” away from the long edge. Backstitch to hold in place.

With the needle down, pull the strap elastic and fabric out until the fabric is straight. Sew with a 1/4” seam allowance to the other tacked edge. You will need to pull the fabric and elastic out straight the entire time sewing.

Flip over and repeat along the other edge.

STEP 4: Attach Strap to Main Fabric
Fold Main Fabric in half lengthwise with the seam centered. WSF is facing out.

Slide strap into one of the edges so that it is centered along the seam.


Fold over one half of the Main Fabric several times to create 3 to 4 pleats halfway across the strap. Just eyeball the pleats, nothing fancy.

Sew using a 1/4” seam allowance halfway across the strap to hold pleats in place.

Repeat on these steps to pleat and sew strap to main fabric on the other end.

Finished Pleats Above
STEP 5: Finishing the Headband
Turn headband from wrong side of fabric to the right side of fabric by pulling fabric through the opening.

Fold open the edges of the gap over by a 1/4” and pin to hold fabric together.

With a 1/8” seam allowance, sew the gap closed.

Congratulations! You Are Finished!
You are ready for the beach! This summer accessory will add personality, function and style to a picnic, barbeque, swim day or any activity you enjoy. Making and wearing handmade items allows you to have a one-of-a-kind wearable that sets you apart. Keep sewing and be creative!

We created this tutorial to be shared. Sewing is a passion for us, and we love to create projects for our sewing community. Please pass this tutorial on to your sewing friends. If there are any projects you need help with or would like to see a tutorial for, please let us know. It is a joy to work with our fellow sewists and create handmade fabric pieces.
If you make these napkins, please tag us on Instagram @little.fabric.shop so we can see your work and we can share your creativity to inspire other makers. Happy Sewing!


